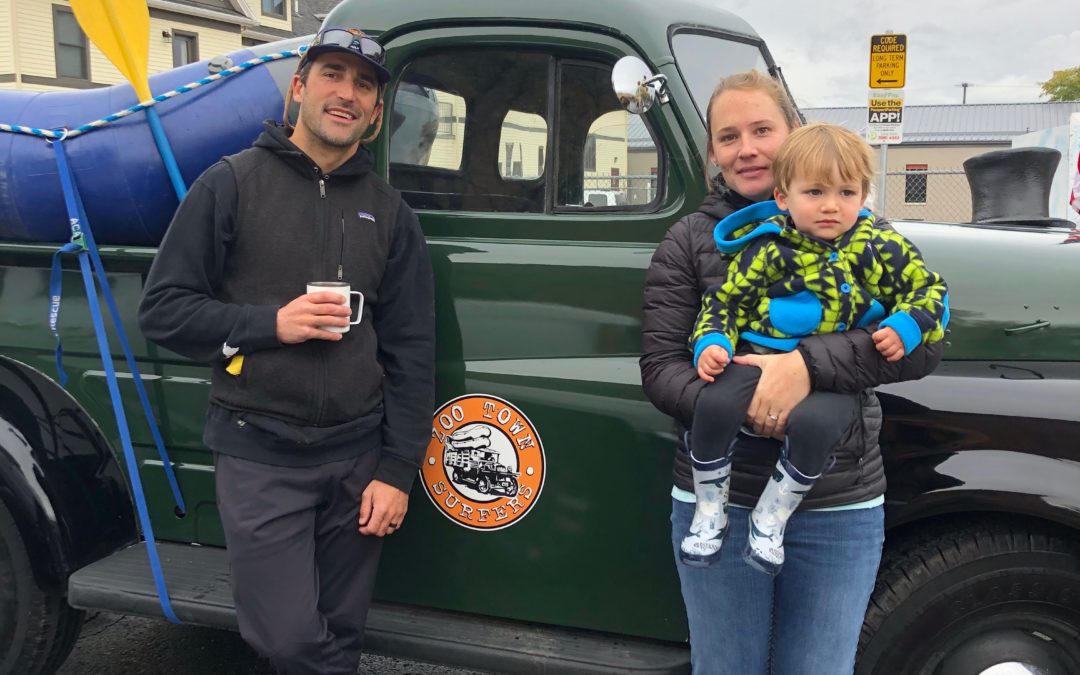
The season is almost over for us river guides here in Western Montana. With winter coming, many of us have already shifted into off-season mode. It was a fantastic summer, and I’m so grateful to work with amazing people while calling the river my office.
I couldn’t be happier with what we achieved together on and off the river. Of course, we’ve got a few things to work on during the off-season.
Behind the Scenes with Expert Guides
Here at Zoo Town Surfers, we bring a lot of energy every day and treat each trip as if it were our first. Our guests deserve that level of enthusiasm. Still, there’s a reason the season ends—everyone needs a break from the daily routine of being a river guide.
Transitioning into the off-season can be tough. I love the busy days, the challenging logistics, and even the chaos of running a river business. But sometimes (maybe one or two days each season), I find myself wondering, “Why on earth am I doing this?” I end up sitting next to a broken-down vehicle or trailer, reflecting on it all.
I go from barely sleeping to wondering what I’ll do next. It takes a little time to adjust to fall work and other jobs.
The season always seems to end so quickly and informally. I always hope for one more chance to get everyone together for one last hurrah, but then it’s over.
Memorable Moments and Lessons Learned
Here are some of the highlights from the 2019 season:
Surf lessons: Last season we worked out the kinks, and this year we really went for it. Kevin and Liam did an amazing job teaching, and we’re excited to bring even more opportunities next season.
First-year guides: It’s not easy being new, but you have to start somewhere! Our first-year guides—Sorrel, Clara, Mitch, Brit, Max, and Liam—did a fantastic job. I couldn’t be prouder of their progress.
International guides: We’re always looking to add more diversity to our team. Tommy came over from Chile and brought incredible professionalism and skills.
Record numbers: This summer was a big one for us. We’re growing each season, and more people are choosing Missoula as their destination. We want to offer more opportunities for everyone who loves the area.
Perfect safety record: We kept a sharp focus on safety while still having loads of fun. No one got hurt—neither our team nor our guests.
These are just some of the highlights from 2019. We’re going to work hard during the off-season to keep improving and making our customer experience even better.
Thank you to all our wonderful guests, staff, family, and friends for supporting Zoo Town Surfers. It means the world to us!
If you’re looking for a definitive list of things to do in Missoula, you’ve come to the right place. At Zoo Town Surfers, we update our favorite activities throughout the year as we continue to explore and embrace the best our city has to offer. While the Internet provides endless details, here’s a basic guide to help you start your Missoula adventure!
Go Rafting!
When the summer heat kicks in, nothing beats a refreshing rafting trip. Local outfitters are ready to handle the logistics, whether you’re squeezing in a quick sunset float through Hellgate Canyon or planning a full-day excursion along the crystal clear Blackfoot River, just east of Missoula.
Go Hiking!
Discover the natural beauty of the Rattlesnake Recreation Area, located just north of Missoula. With endless hiking and biking opportunities available at your own pace, this area is a true gem. Please note, canine companions must be leashed within a few miles of the main trailhead.
Go Biking!
Rent a bike from your local shop and set off for an adventure on the trails. Explore Blue Mountain or venture back to Rattlesnake Recreation Area for some of the state’s best mountain biking. With diverse trails available, you’re sure to find a route that suits your style.
Eat Local Food!
Missoula’s dynamic food scene is a must-try, especially after a day of outdoor fun. In the summertime, visit the Saturday Clark Fork Farmer’s Market at Caras Park, right along the river. Also, don’t miss “Out to Lunch” every Wednesday from June through August, where food trucks and live music create a lively midday atmosphere. At Zoo Town Surfers, we’re happy to share our favorite local haunts—just give us a call!
Drink Local Beer!
No trip to Missoula is complete without sampling the local brews. After a river trip, unwind with a cold one from Big Sky Brewing Co. at their westside taproom near the popular Big Sky Brewing Co. Amphitheater. Enjoy Draught Works beer—often served alongside a food truck—and catch summertime shows at the new Kettlehouse Amphitheater on the banks of the Blackfoot River. For an after-work hangout, visit the Kettlehouse Southside taproom. And for a unique local experience, head downtown to Charlie B’s for a game of pool, classic cocktails, and a taste of southern fare at Dino Cafe.
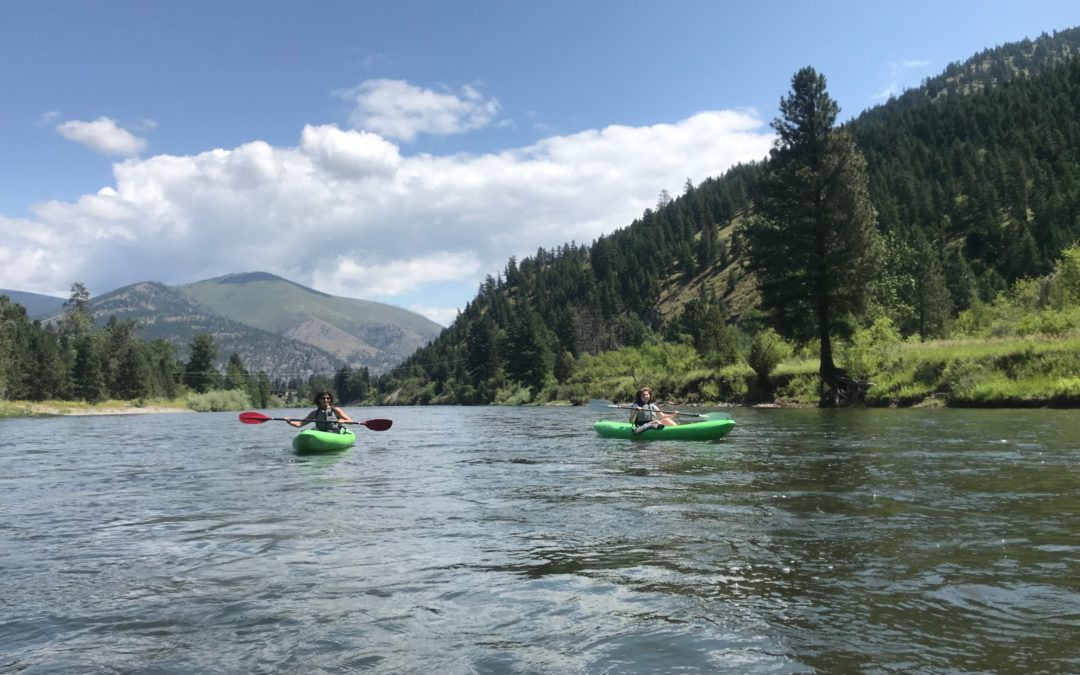
The Blackfoot and Clark Fork Rivers merge just five miles east of Missoula, offering some of the best rafting and scenic river tours in Montana. In the heat of summer, nothing beats spending a day on the water.
In this Missoula river floating guide, we highlight three easy float trips that are perfect for families, beginner rafters, or anyone looking to cool off after a hot day of land-based adventures.
Top Float Trips in the Missoula Valley
Hellgate Canyon Float
Experience our classic summertime “town float”! This route takes you through the dramatic Hellgate Canyon, past the University of Montana, and into vibrant downtown Missoula. Popular with inner-tubers and stand-up paddle-boarders, you’ll also have the chance to spot local kayakers and river surfers as you cruise past Brennan’s Wave.
Milltown to Downtown Float
Combine two classic Montana river experiences in one day with this route. Begin your journey on the Blackfoot River above historic Milltown, then float through the confluence with the Clark Fork River. Along the way, you’ll pass the old Milltown Dam, glide through East Missoula, and eventually reach the lively heart of downtown Missoula.
Kona to Harper’s Float
A few miles west (or downstream) of Missoula, this stretch of the Clark Fork River is known for its stunning scenery, tranquil waters, inviting swimming holes, and excellent bird watching. It’s a peaceful escape that showcases Montana’s natural beauty.
Etiquette for River Runners
Following local river etiquette ensures that everyone can enjoy these beautiful waterways. Here are some important guidelines:
No Glass: Always bring beverages in cans. Never throw cans or bottles in the river.
Pack It In, Pack It Out: Bring all your trash with you and leave no trace.
Discreet Clothing Changes: Use a towel or sarong for privacy during a quick change.
Keep Music Low: Respect the wilderness by keeping your music volume down—save the pop country for later.
Follow Local Laws: Familiarize yourself with and adhere to all local regulations and norms.
Litter Patrol: If you see trash left behind, consider picking it up. Taking care of our rivers is a community effort.
Have questions or need more guidance? Feel free to reach out for additional tips on safely and respectfully floating our rivers.
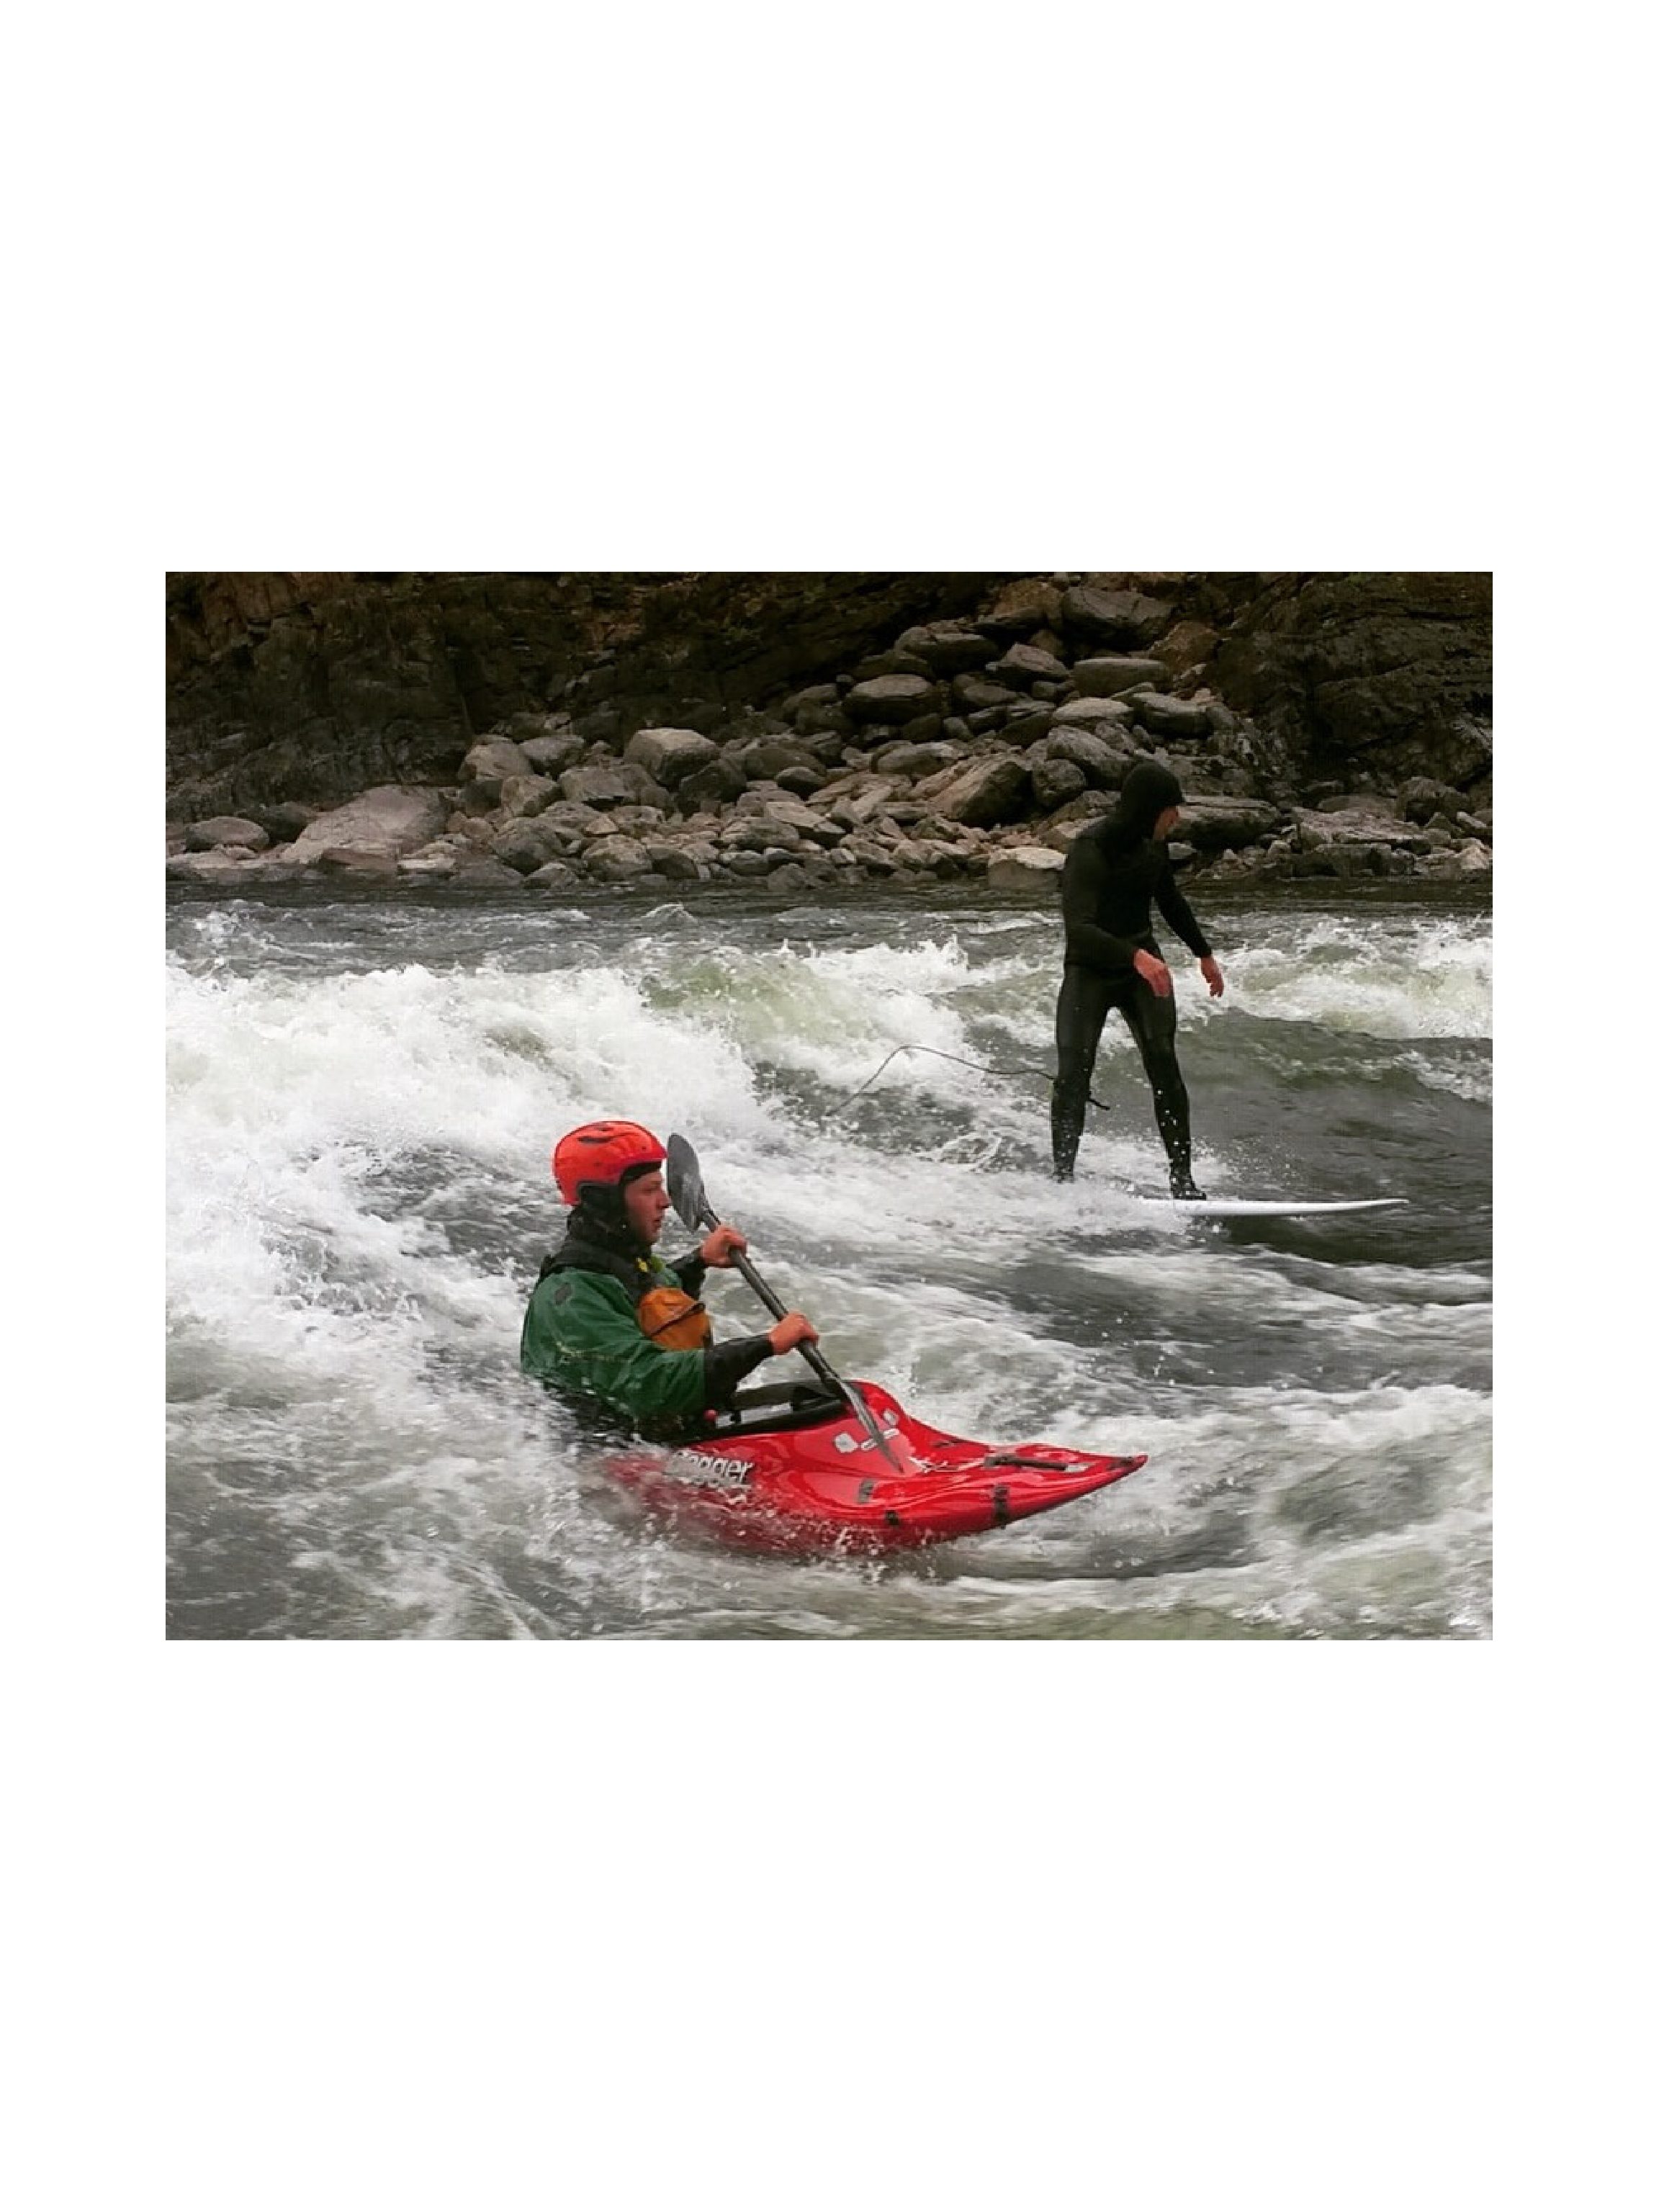
Discover the ultimate playboat experience with our in-depth Dagger Ultrafuge review. In this article, we provide an honest assessment of what makes this kayak one of the best for river-running at Alberton Gorge.
Design & Build Quality
The Dagger Ultrafuge is fast, surfs well, and boasts unique features like effortless spins and flat-water cartwheels. But beyond its technical attributes, the true test of any boat is the joy it brings to its paddler. This Dagger Ultrafuge review explains how one exhilarating ride can change your perspective on whitewater.
The Ultrafugical Paradox – Performance Analysis
After a year of paddling various playboats, I encountered the Ultrafuge under challenging conditions at Brennan’s Wave in Missoula. Initially, the boat’s intense ride left me in discomfort, struggling to maintain balance. However, my next experience at Alberton Gorge was transformative.
Initial Challenge: The first ride was a physical test—paddling felt like torture.
The Turnaround: At the Gorge, despite the earlier discomfort, a 20-minute ride produced an enormous grin that lasted well beyond the trip.
This contrast illustrates that the Ultrafuge turns a simple river run into a playground of endless amusement.
Ultrafuge and the Alberton Gorge
Anyone who has paddled the Gorge knows it’s a playful run, especially at lower flows. Here’s why the Dagger Ultrafuge shines:
Seal Launch Start: The run begins with a seal launch that immediately sets a fun tone.
Zero Wave Performance: Unlike many modern playboats, the Ultrafuge easily surfs the middle hump of Zero Wave without flushing.
Responsive Carves and Spins: The boat executes river-surfer-inspired carves with minimal effort and maintains formidably fast flat spins—reminding you of a Price is Right wheel spun by an amped-up granny.
Vertical Versatility: Whether it’s squirting out of eddy lines or cartwheeling in flat water, the Ultrafuge takes any feature in stride.
Every element of this Dagger Ultrafuge review highlights a kayak that transforms ordinary whitewater into an extraordinary experience.
Is the Dagger Ultrafuge Right for You?
While the Ultrafuge creates many smiles on the river, it comes with a caveat—it is not the most comfortable kayak for long sessions. Consider these points:
Comfort Level: After 30 minutes, you might feel the urge to stretch. The physical demands are part of the experience.
Test for Yourself: If a little discomfort is acceptable in exchange for high performance and fun, the Dagger Ultrafuge might be a perfect addition to your kayak collection.
Fun vs. Pain Ratio: Weigh the exhilarating fun against the inevitable physical strain to determine if this kayak fits your style.
The Bottom Line?
This kayak creates joyful moments and endless excitement on the river. And that’s what paddling is all about.
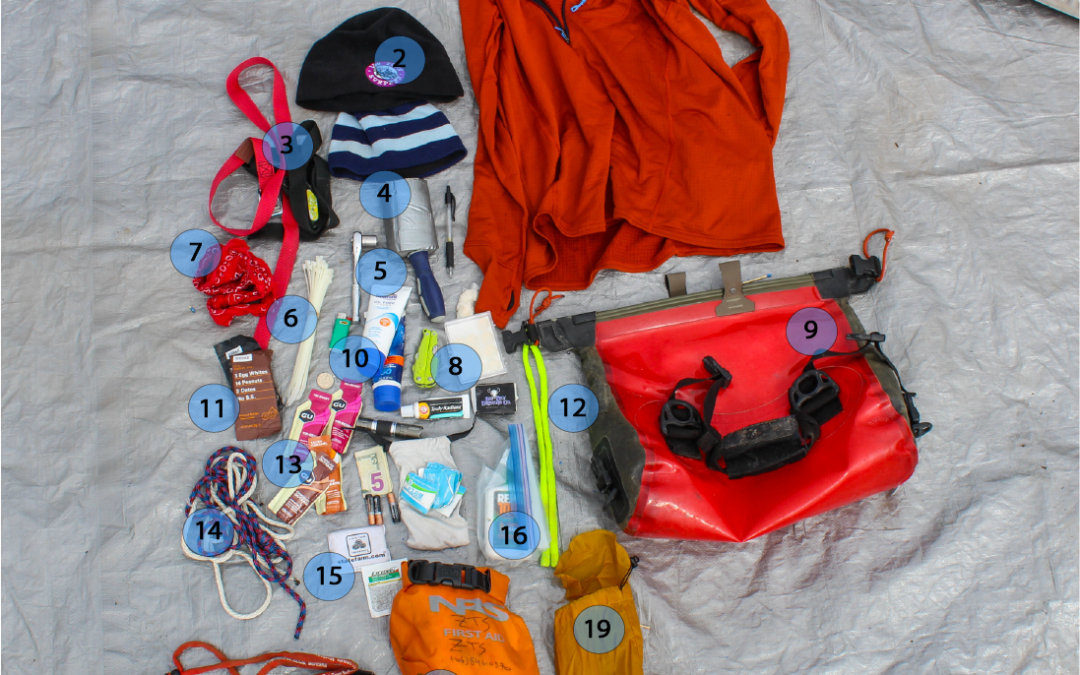
When planning a day on the river, every river guide’s bag tells a unique story of adventure, preparedness, and personal style. As a seasoned guide, I’ve refined my personal bag over time. Whether it’s changing seasons or varying river conditions, my river guide’s bag always evolves to meet the demands of the day. In this post, I share a comprehensive look at the essential gear I carry for day trips on local rivers, along with tips that might inspire you to optimize your own setup.
The Evolution of a River Guide’s Bag
This isn’t the first blog I’ve written about personal lap bags, and it certainly won’t be the last. The more time I spend navigating river rapids and exploring quiet backwaters, the more I learn about what a truly effective river guide’s bag must include. Unlike multi-day expeditions that require bulky packs and extensive storage, my bag is streamlined for day trips—balancing weight, accessibility, and durability without sacrificing preparedness.
One of my favorite choices is the Watershed Ocoee, a go-to bag renowned for its generous storage space and superior waterproof design. For any river guide, a bag that can protect gear from unpredictable water conditions is indispensable, and the Ocoee never disappoints.
Essential Gear for Your River Guide’s Bag
A well-curated river guide’s bag is more than just a collection of items; it’s a portable toolbox that ensures you’re ready for any situation. Below is a detailed list of the larger items I always pack:
Patagonia R1 Fleece: A lightweight, warm layer that’s perfect for unpredictable weather.
Fleece Hats: Essential for keeping warm during early morning or late evening trips.
Extra Straps: Spare straps can be invaluable when securing gear or making quick repairs.
8-1 Screwdriver and ½ Socket: Tools for on-the-spot adjustments and fixes.
Zip Ties: A versatile item that can secure loose equipment or be used in emergency situations.
Bandana: Not only a stylish accessory but also useful for sun protection or as a makeshift cleaning cloth.
Multi Tool: A compact solution for a variety of repair and maintenance tasks.
Watershed Ocoee Dry Bag: Offers additional protection and organization within the main bag.
Sunscreen and Sunglass Holders: Sun safety is a priority when spending long hours on the water.
Snack Bars and Energy Shots: Quick, portable sources of energy during long days.
Prussix/Extra Rope: A must-have for securing gear, tying down equipment, or handling emergencies.
Sewing Kit: For quick repairs to gear or clothing.
Bug Juice: To fend off pesky insects during breaks.
Extra Sunglasses: An extra pair ensures you’re always prepared for bright conditions.
Small First Aid Kit: Vital for treating minor injuries quickly.
Additional Items for a Fully Loaded River Guide’s Bag
Beyond the larger items, there are several smaller essentials that make my river guide’s bag complete:
Pen and Paper: For jotting down observations or important notes.
Matches and Lighter: Critical for emergencies or starting a small, safe fire if needed.
Cash and Batteries: Useful for unexpected expenses or when electronic devices run out of power.
Headlamp and Earplugs: Headlamps extend your working hours into early morning or late evening, and earplugs help maintain focus in noisy environments.
Gloves and Chapstick: Protect your hands during repairs and keep your lips moisturized.
Toilet Paper (with Doggie Bag): An often-overlooked but essential item for personal hygiene.
Hydration Tablets: To ensure you remain well-hydrated, especially on hot days.
Why Your River Guide’s Bag Is More Than Just Gear
Every item in a river guide’s bag is carefully chosen to support the unique challenges of river guiding. Whether it’s adapting to weather changes or dealing with unexpected equipment issues, having a well-organized and thoroughly equipped bag is a key part of any guide’s success. Each piece of gear not only serves a practical purpose but also contributes to the overall safety and enjoyment of the day on the river.
Share Your Gear!
I’m always curious about what other guides choose to carry in their river guide’s bag. Every guide develops a personal system that reflects their experiences and priorities. What items do you swear by? Share your own list in the comments below and let’s build a community of well-prepared river enthusiasts!